


The integration of Power Apps and Power BI presents a powerful synergy, enhancing the functionality and usability of both platforms. In this guide, we’ll explore the seamless creation of a Common Data Service (CDS) table from Excel data and its integration into Power BI, ultimately leading to the development of a robust application for a comprehensive analytics experience.
Creating a Table in Power Apps:
- Sign in to Power Apps:
- Open the Power Apps portal.
- Sign in with your Microsoft or organizational account.
- Access Common Data Service:
- Choose the environment for your table.
- Create a New Table (Entity):
- Navigate to “Entities” and click “+ New entity.”
- Provide details such as name and click “Create.”
- Prepare Excel Data:
- Ensure your Excel file has proper column headers.
- Save the file in a location accessible to Power Apps.
- Import Data into CDS:
- Go back to Common Data Service.
- Select the created table, click “Data,” then “Get Data” or “Import Data.”
- Choose Excel, select the file, and map columns.
- Preview and start the import.
- Review and Validate Data:
- Check the imported data in your CDS table.
- Validate relationships if multiple tables are involved.
- Save and Use Data:
- Save changes in the Common Data Service.
- Utilize the new CDS table in Power Apps or other Power Platform services.
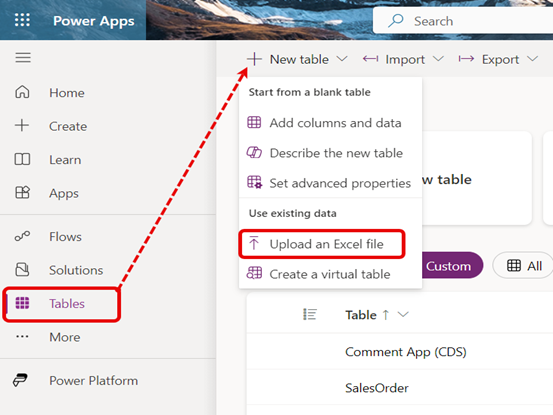
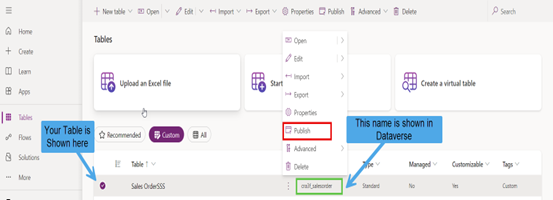
Publish The Table Into Dataverse For Power BI:
- Publish Data in Common Data Service:
- Execute the “Publish” action under the “Data” tab after completing data import.
- In Power BI:
- Navigate to the Power BI interface.
- Specify the relevant environment.
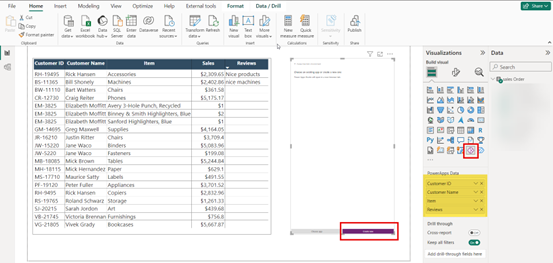
- Identify your table within the discernible green box.
- Facilitate seamless integration by selecting the desired table.
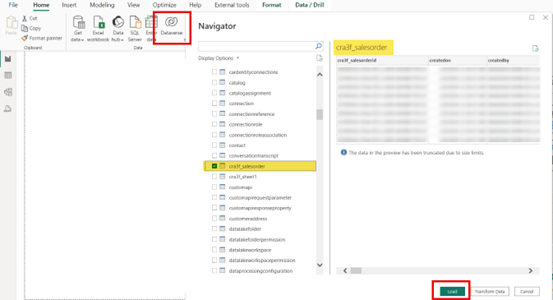
- Retrieve Data in Power BI:
- In the Power BI Dataverse section, locate your table and extract data.
- Proceed to load the dataset into your Power BI environment.
- Upon completing data import within the Common Data Service environment, navigate to the targeted table. Execute the “Publish” action under the “Data” tab. Subsequently, in the Power BI interface. Specify the relevant environment and identify your table within the discernible green box. Facilitate seamless integration by selecting the desired table, ensuring a smooth connection to your Power BI data set for data retrieval from Dataverse.
- “In the image below, the green box represents the name of the dataset in Dataverse when retrieving data in Power BI.”
Integrating Dataverse: A Guide to Importing Data into Power BI:
- Load Dataset in Power BI:
- Locate your table in the Power BI Dataverse section.
- Extract data seamlessly and proceed to load the dataset into your Power BI environment.
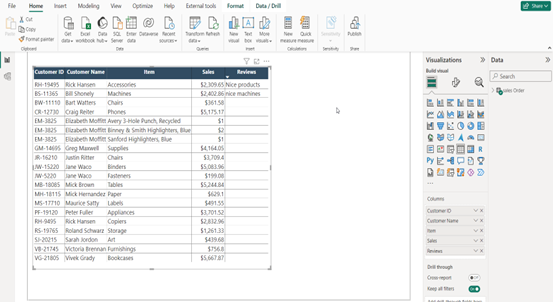
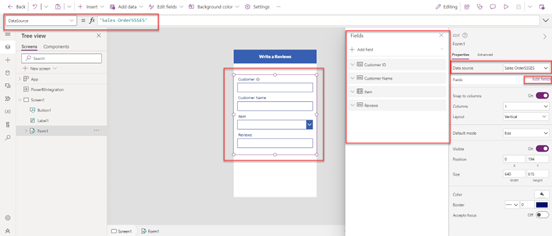
- Customize Fields:
- Create a table in Power BI and add required fields or columns.
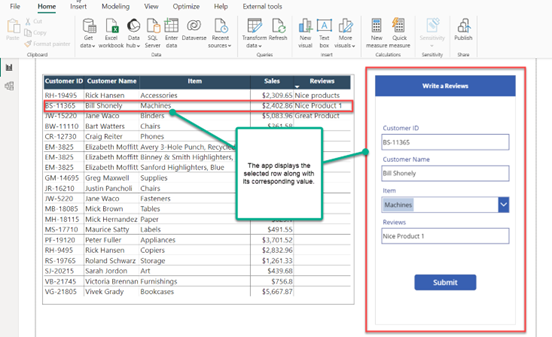
Adding Power App Visual in Power BI:
- Optimizing Power BI Reports:
- Seamlessly integrate Power Apps into Power BI reports.
- Select the Power App visual and add it to your report canvas.
- Enhancing User Experience:
- Embed Power Apps through the ‘Insert’ tab for dynamic data visualization and personalized interactions.
Creating App in Power Apps:
Developing a New Application:
-
- Establish a connection with the designated table.
- Retrieve necessary fields for optimal app performance
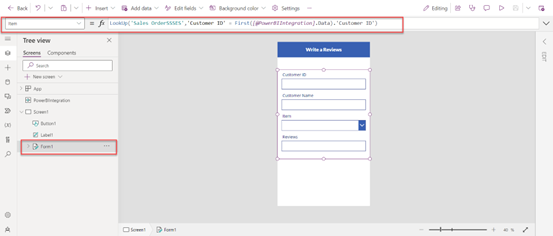
Develop a new application in Power Apps, wherein you establish a connection with the designated table. Retrieve the necessary fields from the connected table to ensure the seamless integration of essential data into the application. This will enhance the overall functionality and effectiveness of the app by incorporating the specific information required for optimal performance.
Writing Code:
-
- Write code for the item field, OnSuccess event, and OnSubmit event for seamless execution.
-

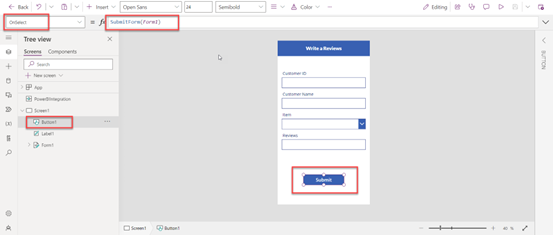
Compose code for the OnSuccess event, ensuring it handles the desired actions seamlessly. Additionally, create code for the OnSubmit event of the button to ensure a professional, error-free execution of the specified field operations. This will contribute to a more robust and reliable functionality within the application.
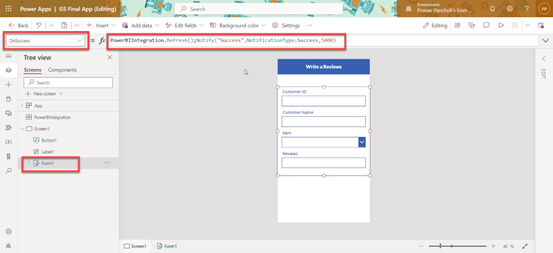
Item = LookUp(‘Your Table’,’Field’ =First(PowerBIIntegration.Data).’Field’)
Button = SubmitForm(Form1)
OnSuccess = PowerBIIntegration.Refresh(); Notify(“Success”,NotificationType.Success,5000)
Formatting and Publishing:
-
- Format and publish the app.
- Access it through the Power BI app visual for seamless integration.
Format and publish the app, then access it through the Power BI app visual. If direct access is not possible, retrieve the app manually from Power Apps within Power-BI for seamless integration.
Conclusion:
By following these steps, you can seamlessly integrate Power Apps and Power BI, creating a streamlined analytics experience that enhances functionality and usability across both platforms.
